Publishing your first book on Amazon KDP does not have to be confusing. This complete guide breaks down everything you need to know, from understanding technical terms like bleed and margins to formatting your book perfectly in Canva. Whether you are creating a paperback novel, hardcover cookbook, or spiral-bound workbook, you will find the exact margin settings, page sizes, and formatting rules that professionals use. This guide explains when to use bleed for coloring books and photo-heavy content versus no bleed for text-based books, how to set up proper margins for different page counts, and what makes spiral binding special. You will also find free promotion strategies, alternative publishing platforms beyond KDP, and essential free tools like Canva and Grammarly. A publishing checklist and easy-to-follow tables are included to make every step as clear as possible, even if you have no prior publishing experience.
The Complete Beginner's Guide to Publishing Books on KDP & Selling Digital Copies
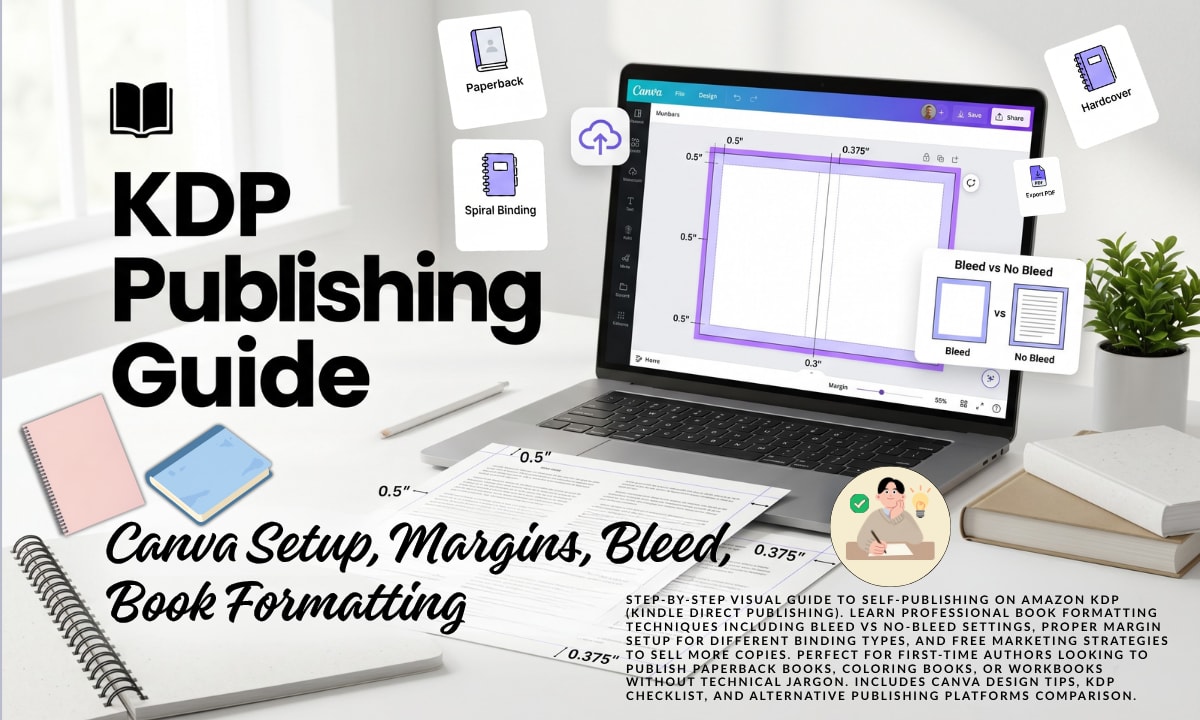
1. Understanding Bleed vs No Bleed
With Bleed
- What Bleed Means: To prevent white edges during printing and cutting, you need to design your pages 0.125 inches larger than the final size.
- Example: Final trimmed size: 8.5x11 inches | Design size with bleed: 8.625x11.25 inches (0.125 inches larger on all sides)
- Cutting process: After printing, 0.125 inches is cut off from all sides (Top, Bottom, Right) to reach the final 8.5x11 inch size.
- Best for: Coloring books, children's books, cookbooks.
No Bleed
- What No Bleed Means: No extra space is added - you design at the exact final size, just following standard margins (0.25-0.5 inches).
- Cutting process: Since there is no bleed, there is no extra cutting, only the extra part of the page (if there is misalignment) may be slightly trimmed during printing. The final size is the size of the design (e.g. 8.5x11 inches).
- Best for: Novels, textbooks, books with mostly text.
Bleed vs No Bleed: Summary
| Feature | With Bleed | No Bleed |
|---|---|---|
| Extra Area (Bleed) | 0.125 inches (all sides) | None |
| Final Size (After Cutting) | 8.5x11 inches | 8.5x11 inches (unchanged) |
| Cutting Process | 0.125 inches trimmed from edges | Only extra edges (if any) are trimmed |
Pro Tips: For bleed books, extend images to the bleed line. For no-bleed books, keep content within margins.
- Inside margin is the margin on the binding side of the book, so we will take the left side.
- The outside margin is the remaining 3 sides: top, bottom, and right side (The side of the book that will not be binding).
2. Paperback vs Hardcover: Which is Better?
Paperback Books
- Cost: Cheaper to produce
- Best for: First-time authors, low-cost books
- KDP choice: Select this if unsure
Hardcover Books
- Cost: More expensive
- Best for: Special editions, gift books
- KDP choice: Only use for premium books
Our Recommendation: Start with paperback - it's cheaper for readers and easier to sell.
3. Setting Margins in Canva (Step-by-Step)
Step 1: Create Your Document
- Log in to Canva and click "Custom Size"
- Set units to inches
- Enter dimensions:
- With Bleed: 8.625" x 11.25"
- No Bleed: 8.5" x 11"
Step 2: Set Margins Using Guides
- Click File → Settings (gear icon)
- Enable "Show rulers and guides"
- Drag guidelines from the left/top edges:
- Example: Page Size - With Bleed, Size 8.625x11.25 and 250 Pages!
- Left (Inside) margin: 0.5" for 250-page books
- Other margins (Top/Bottom/Right): 0.375"
- Lock it as a template (right-click → "Lock element")
- Pro Tip: The ruler shows measurements like "0.500" for 0.5 inches
Alternative Method: Rectangle Shapes
- Go to Elements → Shapes and add a rectangle
- Resize it to leave:
- 0.5" space on left
- 0.375" space on other sides
4. The Complete Beginner's Guide to Spiral Bound Book Design & Printing
This simple guide explains exactly how to prepare your book for spiral binding - from choosing the right size to setting perfect margins, all in plain language anyone can understand.
(i). Best Sizes for Spiral Binding
- A5 (5.83" x 8.27"): Perfect for notebooks, workbooks - fits neatly in bags
- A4 (8.5" x 11"): Best for activity books, cookbooks - gives more space
- KDP Sizes (6"x9", 8.625"x11.25"): Good if you might publish on Amazon later
Money-Saving Tip: A5 size saves paper. You can print two books from one A4 sheet, which significantly reduces your printing cost.
(ii). Spiral Binding Margin Settings
| Book Type | Left Margin | Other Margins | Why? |
|---|---|---|---|
| Spiral Bound | 1.125" | 0.25" | Extra space for spiral coils |
| KDP Paperback | 0.375" | 0.375" | Standard book binding |
Step-by-Step Margin Setup:
- Start with your chosen book size (e.g. 8.625x11.25") and page count: 150
- Left Side: Add 0.75" to KDP's inside margin (0.375" + 0.75" = 1.125") | Leave space for the holes for the spiral binding.
- Other Sides (Top, Bottom, Right): Use 0.25" for safety during hand-cutting
(iii). Bleed vs No Bleed: When to Use Each
| Feature | With Bleed | No Bleed |
|---|---|---|
| Best For | Coloring books, photo books | Novels, text books |
| Page Size | 8.625" x 11.25" (A4 with bleed) | 8.5" x 11" (exact A4) |
| Extra Space | 0.125" on edges for cutting | No extra space |
How Bleed Works:
Imagine printing a family photo to frame:
- With Bleed: You print slightly bigger than the frame, then trim to fit perfectly
- No Bleed: You print exactly the frame size, leaving white borders if not perfectly centered
- Note: Bleed does not mean original size. Adding bleed will make it 8.625x11.25. (Example: 8.625 bleed means "right side" → 8.5+0.125= 8.625. Only one side, no bleed on the left side, because that is the binding side.)
- The 0.125" bleed will be cut off during printing.
(iv). Safe Zones for Important Content
No Bleed for books (8.5" x 11"):
- Margins: Left Side: 1.125", Other Sides: 0.25"
- Safe Zone (content storage): Left Side: Start content at 1.375". Other Sides: Keep content within 0.5" from edges.
For books with Bleed (8.625" x 11.25"):
- Margins: Left Side: 1.125", Other Sides: 0.25" (plus 0.125" extra will be cut for bleed)
- Safe Zone (content storage): Left Side: Start at 1.375". Right/Top/Bottom: Indent 0.375"
Design Tip: Use light guide lines in Canva or Word to mark your safe zones before adding any content to your pages.
(v). What to Tell Your Print Shop
For Books With Bleed:
"Please print this 8.625" x 11.25" book with a 1.125" left margin for spiral coils. Trim 0.125" from top, bottom, and right edges."
For Books Without Bleed:
"Please print this 8.5" x 11" book with a 1.125" left margin for spiral coils. No trimming needed on other sides."
(vi). Why Customers Love Spiral Bound Books
- Lays flat when open - great for cookbooks/coloring
- More durable than glued binding
- Easier to photocopy pages
- Professional look for workbooks
5. Simple Formatting for All Book Types
Fiction Books Formatting
- Use 11-12pt easy-to-read fonts like Times New Roman
- 1.5 line spacing for comfortable reading
- Start each chapter on right-hand page
Non-Fiction Books Formatting
- Use clear headings and subheadings
- Add space around images/diagrams
- Include page numbers and table of contents
6. How to Promote Books Without Ads
- Social Media: Share book pages on Facebook/Instagram
- Email List: Build a free list using Mailchimp
- Book Sites: Submit to Goodreads
- Local Stores: Ask to sell your physical copies
- Blogging: Write about your book's topic
7. Free Alternatives to KDP
| Platform | Best For | vs KDP |
|---|---|---|
| Lulu | Print-on-demand | More format options |
| Barnes & Noble Press | US bookstore sales | Better US store presence |
| Kobo Writing Life | International sales | Better outside Amazon |
8. KDP Publishing Checklist
- Choose between paperback or hardcover
- Pick correct size (6"x9" most popular)
- Set proper margins
- Create cover that matches KDP template
- Upload files and preview carefully
- Set price (KDP takes 40-60% royalty)
- Publish and wait 72 hours for approval
Important Rules:
- No copyrighted material
- Minimum 24 pages
- Must have readable text
9. Most Popular Book Types
Fiction Books
- Romance novels
- Mystery stories
- Science fiction
- Children's picture books
Non-Fiction Books
- Self-help books
- Cookbooks
- How-to guides
- Coloring books
- Academic workbooks
10. Essential Free Tools
- Canva - For book covers and layouts
- Grammarly - Checks spelling and grammar
- Scribus - Free book formatting software
- KDP Cover Calculator - Get exact cover sizes
Final Thoughts
Publishing a book on Amazon KDP is much more manageable once you understand the key concepts like bleed, margins, and formatting rules. Whether you are making a simple paperback novel or a professionally spiral-bound workbook, the steps in this guide give you everything you need to get started with confidence.
Use the checklist in Section 8 before you upload your files, and always preview your book carefully inside KDP before hitting publish. Take your time with the formatting and your book will look professional from day one.
For more help, visit Amazon KDP or join author communities where experienced publishers share tips and answer questions for free.
Please do not enter any spam links in the comment box.