An ID card is something almost everyone needs — for school, work, events, or personal use. The good news is you do not need a designer or expensive software to make one. With Canva, you can create a professional-looking ID card for free in just a few minutes. In this guide, you will learn what an ID card is, what types are available, what information to add, and exactly how to design one in Canva step by step — even if you have never used design software before.
What Is an ID Card
An ID card is a small card that shows who a person is. It usually includes a photo, name, and basic details like a job title, student grade, or organization name. ID cards are used every day in schools, offices, events, and many other places to identify people quickly and professionally.
The standard ID card size used worldwide is 54mm x 85.6mm — the same size as a credit card. This size fits all badge holders, lanyards, and card sleeves.
Types of ID Cards
There are several types of ID cards based on who uses them and where. Here are the most common ones:
| ID Card Type | Who It Is For | Common Use |
|---|---|---|
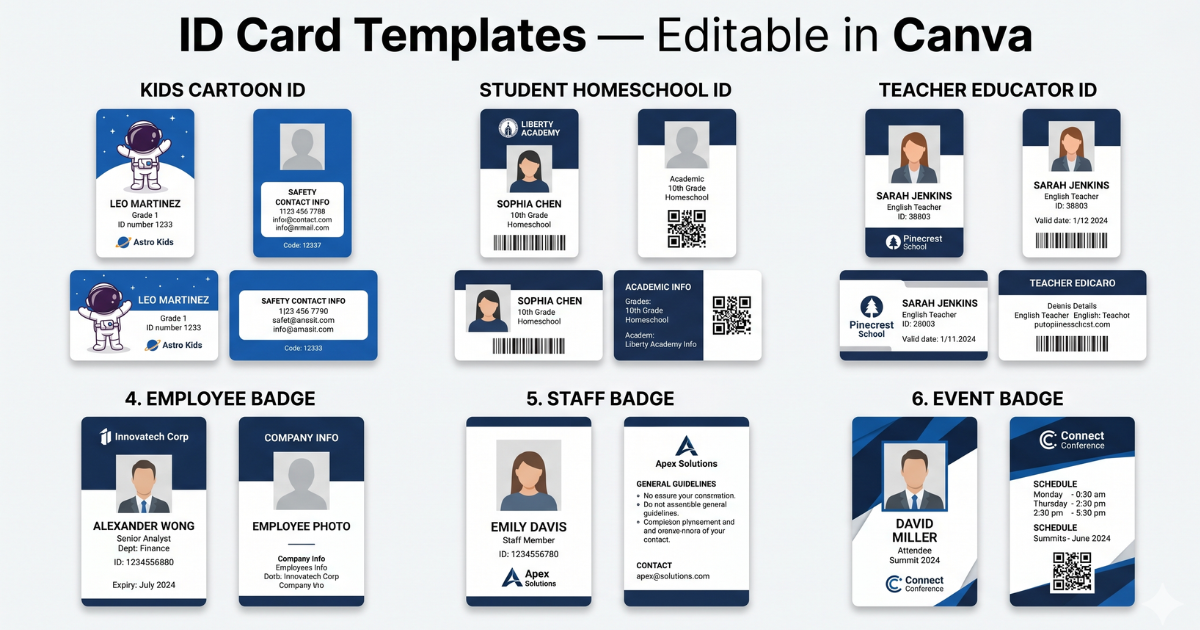
| Kids ID Card | Children ages 5 to 12 | School trips, identification, fun cards with cartoon elements |
| Student ID Card | Homeschool students | Identification, school activities, library access |
| Teacher ID Card | Homeschool educators, tutors, independent teachers | Identification, educator discounts at stores and museums |
| Employee ID Card | Paid workers at any business | Office identification, access control, professional credibility |
| Staff ID Card | Volunteers, part-time workers, contractors | Events, schools, nonprofits, temporary roles |
| Event Badge | Conference, workshop, festival, or school event attendees | Attendee identification, access zones, lanyard badge |
What Information to Add on an ID Card
The information on an ID card depends on the type, but here are the standard fields used across all categories.
Front Side
- Full name of the person
- Photo — a clear headshot
- Role or title — for example: Student, Teacher, Employee, Attendee
- Organization name — school, company, or event name
- ID number — for example: STU-0001, EMP-0047, EVT-0012
- Date of birth — for student and kids cards
- Valid until date — especially for employee and staff cards
- Decorative barcode — adds a professional look (visual only)
Back Side
- Emergency contact — name and phone number (for kids and student cards)
- Blood type and allergies — for kids cards only
- Company or school address — for employee and staff cards
- Terms of use — for employee cards
- QR code placeholder — link to a website, contact info, or LinkedIn profile
- Event schedule — for event badges
ID Card Design Basics
Before designing, it helps to understand a few simple rules that make an ID card look professional.
Card Size and Orientation
| Card Type | Orientation | Canvas Size in Canva |
|---|---|---|
| Kids, Student, Teacher, Event Badge | Portrait (vertical) | Width: 54mm, Height: 85.6mm |
| Employee Badge, Staff Badge | Landscape (horizontal) | Width: 85.6mm, Height: 54mm |
Safe Zone and Bleed
- Keep all text, photos, and logos 4mm away from every edge — this is called the safe zone
- When downloading, turn on Crop marks and bleed in Canva — this adds 3mm extra so the card prints cleanly to the edge
Fonts to Use
- Name and headings: Montserrat Bold
- Information fields: Lato Regular or Open Sans Regular
- Use a maximum of 2 fonts per card
Colors
- Use a maximum of 3 colors per card
- Dark background with white text looks professional and is easy to read
- Popular choices: Navy Blue (#1A3A6B), Gold (#F4A729), White (#FFFFFF)
Lanyard Slot
- Portrait cards need a lanyard slot at the top center — slot size: 12.5mm wide x 3mm tall, position: 4mm from the top edge
- Landscape cards do not need a slot — they go inside a badge holder which has its own clip for the lanyard
How to Design an ID Card in Canva
Follow these steps to design your ID card from scratch in Canva. You only need a free Canva account — no paid subscription is required.
How to Add a QR Code to Your ID Card
A QR code on the back of the card lets anyone scan it to see more information — a website, contact details, or a LinkedIn profile. You can create one in two ways:
- Inside Canva: Go to Apps in the left sidebar, search "QR Code", enter your URL, generate it, and place it on the back of the card.
- Outside Canva: Search "free QR code generator" on Google, create one, download as PNG, and upload it to your Canva design.
How to Print Your ID Card
At a Local Print Shop (Recommended)
This is the easiest and best quality option. Give the shop your PDF file and ask for the following:
- Print at actual size on 300 GSM card stock
- Laminate both sides
- Cut along the crop marks to 54mm x 85.6mm
- Round the corners to 3.5mm radius
- Punch a lanyard slot at the top center (portrait cards only — slot size 12.5mm x 3mm)
At Home
- Use thick paper — 200 to 300 GSM card stock
- Print settings: Color, Best quality, 100% actual size — do not scale
- Laminate after printing for durability
- Use a 3-in-1 ID card punch tool to round corners and punch the lanyard slot
Final Thoughts
Designing a professional ID card does not have to be difficult. With the right canvas size, safe zone, fonts, and information fields, anyone can create one in Canva for free. Whether it is for a child, a student, a teacher, an employee, or an event, the steps are the same — set your size, add your details, and download as PDF Print with crop marks and bleed turned on. If you want to save time, a ready-made editable template is the fastest way to get a great result without starting from scratch.
Frequently Asked Questions
The standard ID card size is 54mm x 85.6mm — the same size as a credit card. This size is used worldwide and fits all badge holders, lanyards, and card sleeves.
No. A free Canva account is enough to design, edit, and download ID card templates. You do not need a paid subscription.
A portrait card is vertical — used for kids, student, teacher, and event badges. A landscape card is horizontal — used for employee and staff badges. Portrait cards hang from a lanyard through a slot at the top. Landscape cards go inside a badge holder which has its own clip for the lanyard.
Bleed is a 3mm extra area beyond the card edge that extends the background color. When a print shop cuts the card, the blade may shift slightly. The bleed ensures the color still reaches the edge after cutting. In Canva, turn on "Crop marks and bleed" when downloading as PDF Print.
Yes. The templates are fully editable. You can change the role label, text fields, colors, and elements to turn a student ID into a teacher ID, or a staff badge into an employee badge.
Always download as PDF Print in Canva. This gives the best print quality at 300 DPI. Make sure to turn on "Crop marks and bleed" before downloading.
Please do not enter any spam links in the comment box.